River Safety

OKCC Safety Statement
The OKCC is dedicated to promoting safety on the river and getting everyone home safely. We recommend every paddler take a swift water rescue course within their first year of paddling, with refresher courses every several years thereafter. These are taught by local professionals including Alder Creek Kayak and Canoe, eNRG Kayaking, Clackamas River Outfitters, Gradient River Essentials, and Wet Planet among others. Several local clubs including the OKCC also offer safety classes at various times during the year. OKCC hosted its 1st annual club swiftwater training weekend in 2022 on the N. Fork Willamette, and also recommends the annual safety weekend presented by Willamette Kayak and Canoe Club.
Northwest Rafting Co. has some great info on First Aid kits and Safety Kits - consider having both in your boat.
OKCC Safety & Informational Videos for New Paddlers
The OKCC prides itself on getting new paddlers out on the water safely. With that in mind, we have created a few short informational videos.
Hand Signals & Safe Swimming
Skirts, Wet Exits & T-Rescues
The Basics of Eddy Lines
Disclaimer: These videos are only intended to help new paddlers get acquainted with basic principles and concepts of river safety. They should not be considered a substitute for in-person instruction and swift water training.
Included below is the AWA Whitewater Safety Code, a comprehensive introductory guide that all paddlers, old and new alike should familiarize themselves with.
American Whitewater Code of Safety
Adopted 1959, Revised 2005
Introduction
This code has been prepared using the best available information and has been reviewed by a broad cross-section of whitewater experts. The code, however, is only a collection of guidelines; attempts to minimize risks should be flexible, not constrained by a rigid set of rules. Varying conditions and group goals may combine with unpredictable circumstances to require alternate procedures. This code is not intended to serve as a standard of care for commercial outfitters or guides.
I. Personal Preparedness and Responsibility
- Be a competent swimmer, with the ability to handle yourself underwater.
- Wear a life jacket. a snugly-fitting vest-type life preserver offers back and shoulder protection as well as the flotation needed to swim safely in whitewater.
- Wear a solid, correctly-fitted helmet when upsets are likely. This is essential in kayaks or covered canoes, and recommended for open canoeists using thigh straps and rafters running steep drops.
- Do not boat out of control. Your skills should be sufficient to stop or reach shore before reaching danger. Do not enter a rapid unless you are reasonably sure that you can run it safely or swim it without injury.
- Whitewater rivers contain many hazards which are not always easily recognized. The following are the most frequent killers.
- High Water. The river's speed and power increase tremendously as the flow increases, raising the difficulty of most rapids. Rescue becomes progressively harder as the water rises, adding to the danger. Floating debris and strainers make even an easy rapid quite hazardous. It is often misleading to judge the river level at the put in, Since a small rise in a wide, shallow place will be multiplied many times where the river narrows. Use reliable gauge information whenever possible, and be aware that sun on snowpack, hard rain, and upstream dam releases may greatly increase the flow.
- Cold. Cold drains your strength and robs you of the ability to make sound decisions on matters affecting your survival. Cold-water immersion, because of the initial shock and the rapid heat loss which follows, is especially dangerous. Dress appropriately for bad weather or sudden immersion in the water. When the water temperature is less than 50 degrees F., a wetsuit or drysuit is essential for protection if you swim. Next best is wool or pile clothing under a waterproof shell. In this case, you should also carry waterproof matches and a change of clothing in a waterproof bag. If, after prolonged exposure, a person experiences uncontrollable shaking, loss of coordination, or difficulty speaking, he or she is hypothermic, and needs your assistance.
- Strainers. Brush, fallen trees, bridge pilings, undercut rocks or anything else which allows river current to sweep through can pin boats and boaters against the obstacle. Water pressure on anything trapped this way can be overwhelming. rescue is often extremely difficult. Pinning may occur in fast current, with little or not whitewater to warn of the danger.
- Dams, weirs, ledges, reversals, holes, and hydraulics. When water drops over a obstacle, it curls back on itself, forming a strong upstream current which may be capable of holding a boat or swimmer. Some holes make for excellent sport. Others are proven killers. Paddlers who cannot recognize the difference should avoid all but the smallest holes. Hydraulics around man-made dams must be treated with utmost respect regardless of their height or the level of the river. Despite their seemingly benign appearance, they can create an almost escape-proof trap. The swimmer's only exit from the “drowning machine” is to dive below the surface when the downstream current is flowing beneath the reversal.
- Broaching. when a boat is pushed sideways against a rock by strong current, it may collapse and wrap. this is especially dangerous to kayak and decked canoe paddlers; these boats will collapse and the combination of indestructible hulls and tight outfitting may create a deadly trap. even without entrapment, releasing pinned boats can be extremely time-consuming and dangerous. to avoid pinning, throw your weight downstream towards the rock. this allows the current to slide harmlessly underneath the hull.
- Boating alone is discouraged. The minimum party is three people or two craft.
- Have a frank knowledge of your boating ability, and don't attempt rivers or rapids which lie beyond that ability.
- Be in Good physical and mental condition, consistent with the difficulties which may be expected. Make adjustments for loss of skills due to age, health, fitness. Any health limitations must be explained to your fellow paddlers prior to starting the trip.
- Be practiced in self-rescue, including escape from an overturned craft. The eskimo roll is strongly recommended for decked boaters who run rapids Class IV or greater, or who paddle in cold environmental conditions.
- Be trained in rescue skills, CPR, and first aid with special emphasis on the recognizing and treating hypothermia. It may save your friend's life.
- Carry equipment needed for unexpected emergencies, including foot wear which will protect your feet when walking out, a throw rope, knife, whistle, and waterproof matches. If you wear eyeglasses, tie them on and carry a spare pair on long trips. Bring cloth repair tape on short runs, and a full repair kit on isolated rivers. Do not wear bulky jackets, ponchos, heavy boots, or anything else which could reduce your ability to survive a swim.
- Despite the mutually supportive group structure described in this code, individual paddlers are ultimately responsible for their own safety, and must assume sole responsibility for the following decisions:
- The decision to participate on any trip. This includes an evaluation of the expected difficulty of the rapids under the conditions existing at the time of the put-in.
- The selection of appropriate equipment, including a boat design suited to their skills and the appropriate rescue and survival gear.
- The decision to scout any rapid, and to run or portage according to their best judgment. Other members of the group may offer advice, but paddlers should resist pressure from anyone to paddle beyond their skills. It is also their responsibility to decide whether to pass up any walk-out or take-out opportunity.
- All trip participants should consistently evaluate their own and their group's safety, voicing their concerns when appropriate and following what they believe to be the best course of action. Paddlers are encouraged to speak with anyone whose actions on the water are dangerous, whether they are a part of your group or not.
II. Boat and Equipment Preparedness
- Test new and different equipment under familiar conditions before relying on it for difficult runs. This is especially true when adopting a new boat design or outfitting system. Low-volume craft may present additional hazards to inexperienced or poorly conditioned paddlers.
- Be sure your boat and gear are in good repair before starting a trip. The more isolated and difficult the run, the more rigorous this inspection should be.
- Install flotation bags in non-inflatable craft, securely fixed in each end, designed to displace as much water as possible. Inflatable boats should have multiple air chambers and be test-inflated before launching.
- Have strong, properly sized paddles or oars for controlling your craft. Carry sufficient spares for the length and difficulty of the trip.
- Outfit your boat safely. The ability to exit your boat quickly is an essential component of safety in rapids. It is your responsibility to see that there is absolutely nothing to cause entrapment when coming free of an upset craft. This includes:
- Spray covers which won't release reliably or which release prematurely.
- Boat outfitting too tight to allow a fast exit, especially in low volume kayaks or decked canoes. This includes low-hung thwarts in canoes lacking adequate clearance for your feet and kayak footbraces which fail or allow your feet to become wedged under them.
- Inadequately supported decks which collapse on a paddler's legs when a decked boat is pinned by water pressure. Inadequate clearance with the deck because of your size or build.
- Loose ropes which cause entanglement. Beware of any length of loose line attached to a whitewater boat. All items must be tied tightly and excess line eliminated; painters, throw lines, and safety rope systems must be completely and effectively stored. Do not knot the end of a rope, as it can get caught in cracks between rocks.
- Provide ropes which permit you to hold on to your craft so that it may be rescued. The following methods are recommended:
- Kayaks and covered canoes should have grab loops of 1/4” + rope or equivalent webbing sized to admit a normal-sized hand. Stern painters are permissible if properly secured.
- Open canoes should have securely anchored bow and stern painters consisting of 8 - 10 feet of 1/4” + line. These must be secured in such a way that they are readily accessible, but cannot come loose accidentally. Grab loops are acceptable, but are more difficult to reach after an upset.
- Rafts and dories may have taut perimeter lines threaded through the loops provided. Footholds should be designed so that a paddler's feet cannot be forced through them, causing entrapment. Flip lines should be carefully and reliably stowed.
- Know your craft's carrying capacity, and how added loads affect boat handling in whitewater. Most rafts have a minimum crew size which can be added to on day trips or in easy rapids. Carrying more than two paddlers in an open canoe when running rapids is not recommended.
- Car-top racks must be strong and attach positively to the vehicle. Lash your boat to each crossbar, then tie the ends of the boats directly to the bumpers for added security. This arrangement should survive all but the most violent vehicle accident.
III. Group Preparedness and Responsibility
- Organization. A river trip should be regarded as a common adventure by all participants, except on instructional or commercially guided trips as defined below. Participants share the responsibility for the conduct of the trip, and each participant is individually responsible for judging his or her own capabilities and for his or her own safety as the trip progresses. Participants are encouraged (but are not obligated) to offer advice and guidance for the independent consideration and judgment of others.
- River Conditions. The group should have a reasonable knowledge of the difficulty of the run. Participants should evaluate this information and adjust their plans accordingly. If the run is exploratory or no one is familiar with the river, maps and guidebooks, if available, should be examined. The group should secure accurate flow information; the more difficult the run, the more important this will be. Be aware of possible changes in river level and how this will affect the difficulty of the run. If the trip involves tidal stretches, secure appropriate information on tides.
- Group equipment should be suited to the difficulty of the river. The group should always have a throw-line available, and one line per boat is recommended on difficult runs. The list may include: carabiners, prussic loops, first aid kit, flashlight, folding saw, fire starter, guidebooks, maps, food, extra clothing, and any other rescue or survival items suggested by conditions. Each item is not required on every run, and this list is not meant to be a substitute for good judgment.
- Keep the group compact, but maintain sufficient spacing to avoid collisions. If the group is large, consider dividing into smaller groups or using the “buddy system” as an additional safeguard. Space yourselves closely enough to permit good communication, but not so close as to interfere with one another in rapids.
- A point paddler sets the pace. When in front, do not get in over your head. Never run drops when you cannot see a clear route to the bottom or, for advanced paddlers, a sure route to the next eddy. When in doubt, stop and scout.
- Keep track of all group members. Each boat keeps the one behind it in sight, stopping if necessary. Know how many people are in your group and take head-counts regularly. No one should paddle ahead or walk out without first informing the group. Paddlers requiring additional support should stay at the center of a group, and not allow themselves to lag behind in the more difficult rapids. If the group is large and contains a wide range of abilities, a “sweep boat” may be designated to bring up the rear.
- Courtesy. On heavily used rivers, do not cut in front of a boater running a drop. Always look upstream before leaving eddies to run or play. Never enter a crowded drop or eddy when no room for you exists. Passing other groups in a rapid may be hazardous; it's often safer to wait upstream until the group ahead has passed.
- Float Plan. If the trip is into a wilderness area or for an extended period, plans should be filed with a responsible person who will contact the authorities if you are overdue. It may be wise to establish checkpoints along the way where civilization could be contacted if necessary. Knowing the location of possible help and planning escape routes can speed rescue.
- Drugs. The use of alcohol or mind-altering drugs before or during river trips is not recommended. It dulls reflexes, reduces decision-making ability, and may interfere with important survival reflexes.
- Instructional or commercially guided trips. In contrast to the common adventure trip format, in these trip formats, a boating instructor or commercial guide assumes some of the responsibilities normally exercised by the group as a whole, as appropriate under the circumstances. These formats recognize that instructional or commercially guided trips may involve participants who lack significant experience in whitewater. However, as a participant acquires experience in whitewater, he or she takes on increasing responsibility for his or her own safety, in accordance with what he or she knows or should know as a result of that increased experience. Also, as in all trip formats, every participant must realize and assume the risks associated with the serious hazards of whitewater rivers.
- It is advisable for instructors and commercial guides or their employers to acquire trip or personal liability insurance:
- An “instructional trip” is characterized by a clear teacher/pupil relationship, where the primary purpose of the trip is to teach boating skills, and which is conducted for a fee.
- A “commercially guided trip” is characterized by a licensed, professional guide conducting trips for a fee.
IV. Guidelines for River Rescue
- Recover from an upset with an eskimo roll whenever possible. Evacuate your boat immediately if there is imminent danger of being trapped against rocks, brush, or any other kind of strainer.
- If you swim, hold on to your boat. It has much flotation and is easy for rescuers to spot. Get to the upstream end so that you cannot be crushed between a rock and your boat by the force of the current. Persons with good balance may be able to climb on top of a swamped kayak or flipped raft and paddle to shore.
- Release your craft if this will improve your chances, especially if the water is cold or dangerous rapids lie ahead. Actively attempt self-rescue whenever possible by swimming for safety. Be prepared to assist others who may come to your aid.
- When swimming in shallow or obstructed rapids, lie on your back with feet held high and pointed downstream. Do not attempt to stand in fast moving water; if your foot wedges on the bottom, fast water will push you under and keep you there. get to slow or very shallow water before attempting to stand or walk. Look ahead! Avoid possible pinning situations including undercut rocks, strainers, downed trees, holes, and other dangers by swimming away from them.
- If the rapids are deep and powerful, roll over onto your stomach and swim aggressively for shore. watch for eddies and slackwater and use them to get out of the current. Strong swimmers can effect a powerful upstream ferry and get to shore fast. If the shores are obstructed with strainers or under cut rocks, however, it is safer to “ride the rapid out” until a safer escape can be found.
- If others spill and swim, go after the boaters first. Rescue boats and equipment only if this can be done safely. While participants are encouraged (but not obligated) to assist one another to the best of their ability, they should do so only if they can, in their judgment, do so safely. The first duty of a rescuer is not to compound the problem by becoming another victim.
- The use of rescue lines requires training; uninformed use may cause injury. Never tie yourself into either end of a line without a reliable quick-release system. Have a knife handy to deal with unexpected entanglement. Learn to place set lines effectively, to throw accurately, to belay effectively, and to properly handle a rope thrown to you.
- When reviving a drowning victim, be aware that cold water may greatly extend survival time underwater. Victims of hypothermia may have depressed vital signs so they look and feel dead. Don't give up; continue CPR for as long as possible without compromising safety.
V. Universal River Signals
These signals may be substituted by signals agreed upon by the group
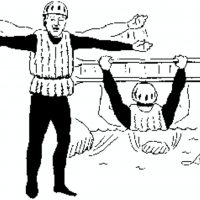
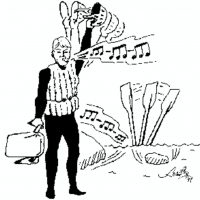
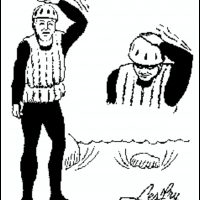

Previous
Next
VI. International Scale of River Difficulty
This code has been prepared using the best available information and has been reviewed by a broad cross-section of whitewater experts. The code, however, is only a collection of guidelines; attempts to minimize risks should be flexible, not constrained by a rigid set of rules. Varying conditions and group goals may combine with unpredictable circumstances to require alternate procedures. This code is not intended to serve as a standard of care for commercial outfitters or guides.
The Scale
International Scale of River Difficulty (see Section VI of the Safety Code of American Whitewater for complete descriptions)
This is the American version of a rating system used to compare river difficulty throughout the world. This system is not exact; rivers do not always fit easily into one category, and regional or individual interpretations may cause misunderstandings. It is no substitute for a guidebook or accurate first-hand descriptions of a run.
Paddlers attempting difficult runs in an unfamiliar area should act cautiously until they get a feel for the way the scale is interpreted locally. River difficulty may change each year due to fluctuations in water level, downed trees, recent floods, geological disturbances, or bad weather. Stay alert for unexpected problems!
As river difficulty increases, the danger to swimming paddlers becomes more severe. As rapids become longer and more continuous, the challenge increases. There is a difference between running an occasional Class-IV rapid and dealing with an entire river of this category. Allow an extra margin of safety between skills and river ratings when the water is cold or if the river itself is remote and inaccessible.
The links below lead to the 3 parts of a list of examples of commonly run rapids that fit each of the classifications. Rapids of a difficulty similar to a rapid on this list are rated the same. Rivers are also rated using this scale. An overall river rating should take into account many factors including the difficulty of individual rapids, remoteness, hazards, etc. Each rapid is rated at a specific range of levels. Note that under some circumstances a paddler may find that similarly rated rapids seem to differ an extraordinary amount due to unusual factors that may include boat type, weather, fatigue, and limited experience on certain types of whitewater.
The six difficulty classes:
Class I Rapids
List of Class I thru III Rated Rapids
Fast moving water with riffles and small waves. Few obstructions, all obvious and easily missed with little training. Risk to swimmers is slight; self-rescue is easy.
Class II Rapids: Novice
List of Class I thru III Rated Rapids
Straightforward rapids with wide, clear channels which are evident without scouting. Occasional maneuvering may be required, but rocks and medium-sized waves are easily missed by trained paddlers. Swimmers are seldom injured and group assistance, while helpful, is seldom needed. Rapids that are at the upper end of this difficulty range are designated “Class II+”.
Class III: Intermediate
List of Class III Rated Rapids
Rapids with moderate, irregular waves which may be difficult to avoid and which can swamp an open canoe. Complex maneuvers in fast current and good boat control in tight passages or around ledges are often required; large waves or strainers may be present but are easily avoided. Strong eddies and powerful current effects can be found, particularly on large-volume rivers. scouting is advisable for inexperienced parties. Injuries while swimming are rare; self-rescue is usually easy but group assistance may be required to avoid long swims. Rapids that are at the lower or upper end of this difficulty range are designated “Class III-” or “Class III+” respectively.
Class IV: Advanced
Intense, powerful but predictable rapids requiring precise boat handling in turbulent water. Depending on the character of the river, it may feature large, unavoidable waves and holes or constricted passages demanding fast maneuvers under pressure. A fast, reliable eddy turn may be needed to initiate maneuvers, scout rapids, or rest. Rapids may require “must” moves above dangerous hazards. Scouting may be necessary the first time down. Risk of injury to swimmers is moderate to high, and water conditions may make self-rescue difficult. Group assistance for rescue is often essential but requires practiced skills. A strong eskimo roll is highly recommended. Rapids that are at the lower or upper end of this difficulty range are designated “Class IV-” or “Class IV+” respectively.
Class V: Expert
Extremely long, obstructed, or very violent rapids which expose a paddler to added risk. Drops may contain** large, unavoidable waves and holes or steep, congested chutes with complex, demanding routes. Rapids may continue for long distances between pools, demanding a high level of fitness. What eddies exist may be small, turbulent, or difficult to reach. At the high end of the scale, several of these factors may be combined. Scouting is recommended but may be difficult. Swims are dangerous, and rescue is often difficult even for experts. A very reliable eskimo roll, proper equipment, extensive experience, and practiced rescue skills are essential. Because of the large range of difficulty that exists beyond Class IV, Class 5 is an open-ended, multiple-level scale designated by class 5.0, 5.1, 5.2, etc… each of these levels is an order of magnitude more difficult than the last. Example: increasing difficulty from Class 5.0 to Class 5.1 is a similar order of magnitude as increasing from Class IV to Class 5.0.
The story behind the American Whitewater rating scale project:
1998 Revisions to the Safety Code of American Whitewater Complete, May-June, 1998
Upgrading the American Version of the International Scale of River Difficulty, Sept-Oct, 1997
Rating Survey Letter (used to solicit input to the benchmarked rapids)
Standard Rated Rapids: Class I-III
Standard Rated Rapids: Class IV
Standard Rated Rapids: Class V
For additional copies please write to:
American Whitewater
PO Box 1540, Cullowhee, NC 28723
email: info@amwhitewater.org
Copyright 1998, American Whitewater

